Managing the boot menu


Manage Boot Menu
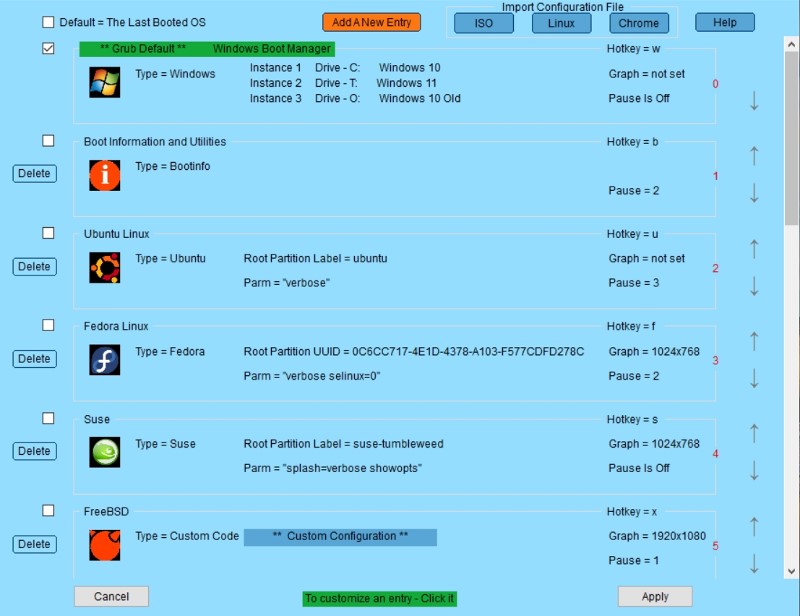
This screen will appear when you click the Manage Boot Menu button on the Main Configuration screen.
To customize an entry, click inside the box for the entry.
This will bring up the Edit OS Details screen.
Use the up / down arrows on the right to change the menu sequence.
Default = Last Booted OS
When you check this box, the last OS booted by Grub2Win will automatically become the new default.
Default Checkbox - On the upper left corner of each menu item
Check this box for the OS you want to start automatically at Grub boot time if no keys are pressed. These boxes will not be visible if you have checked the "Last Booted OS" box above.
When you check this box, the menu item will be highlighted in green.
Add A New Entry
Creates an additional selection and brings up the Edit OS details screen for the new selection.
Import Configuration File
Click the ISO button to import entries from Linux .iso files.
See the Importing Linux ISO Files topic for details.
or
Click the Linux button to import entries from .cfg files created by GNU Grub within Linux
See the Importing Linux Config Files topic for details.
or
Click the Chrome button to import entries from configuration files created by Brunch.
See the Importing ChromeOS Config Files topic for details.
Delete
Removes a selection from the grub menu. No software is actually removed from your computer, it simply is not displayed by in the Grub menu at boot time. At least one menuentry must remain for Grub to function properly. Windows can be deleted if you only want to select from Linux systems.
Remove The User Section
Clears the User Section code and removes the User Section from the configuration
Editing the existing User Section
If there are User Section menu entries present at the bottom of the configuration, simply click one of them to update the User Section code.
Grub2Win then opens an editor window so that you can edit the C:\grub2\userfiles\usersection.cfg file.
When you close the editor window, the file will be scanned for simple syntax errors.
Creating the User Section
If no user section is currently present, click the "Add A New Entry" button and select type "create user section". An editor window will open for you to enter your code. When you save the file, the User Section will be created.
Created with the Personal Edition of HelpNDoc: Maximize Your Documentation Capabilities with HelpNDoc's User-Friendly UI